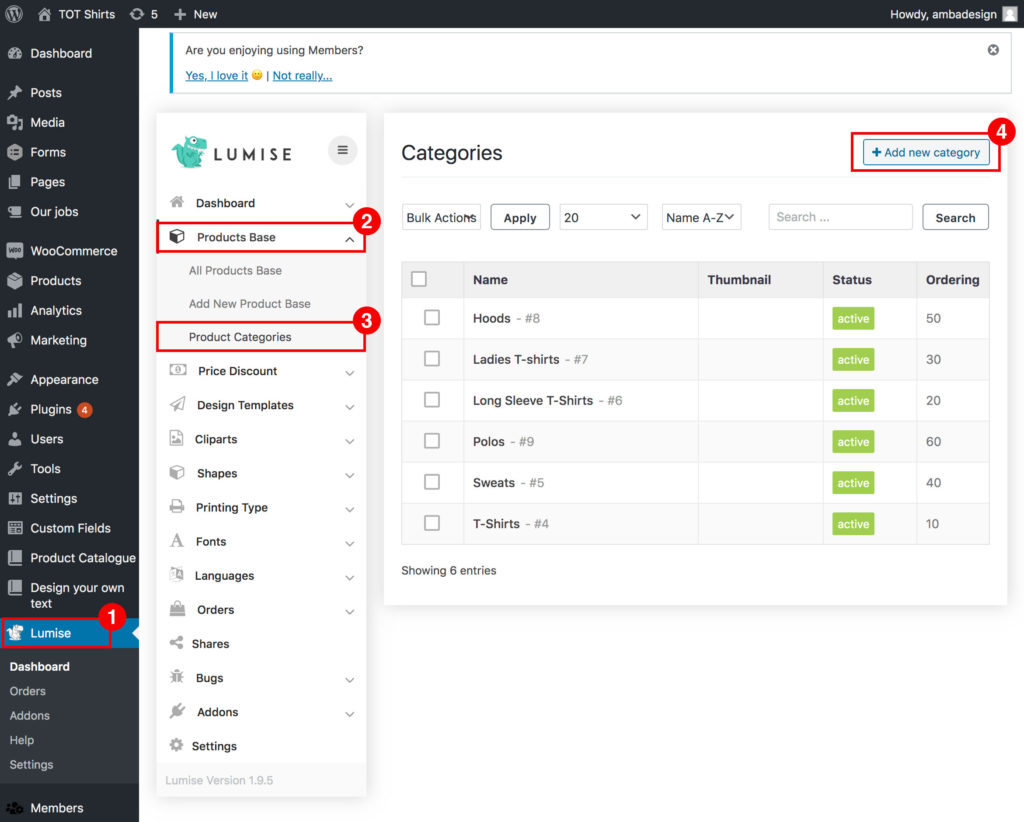
To add a new category:
- When logged into the back end of the site, click “Lumise” from the left hand menu.
- From the Lumise menu click on “Product Base”.
- Then click “Product Categories”.
- Click on “+ Add new category”.
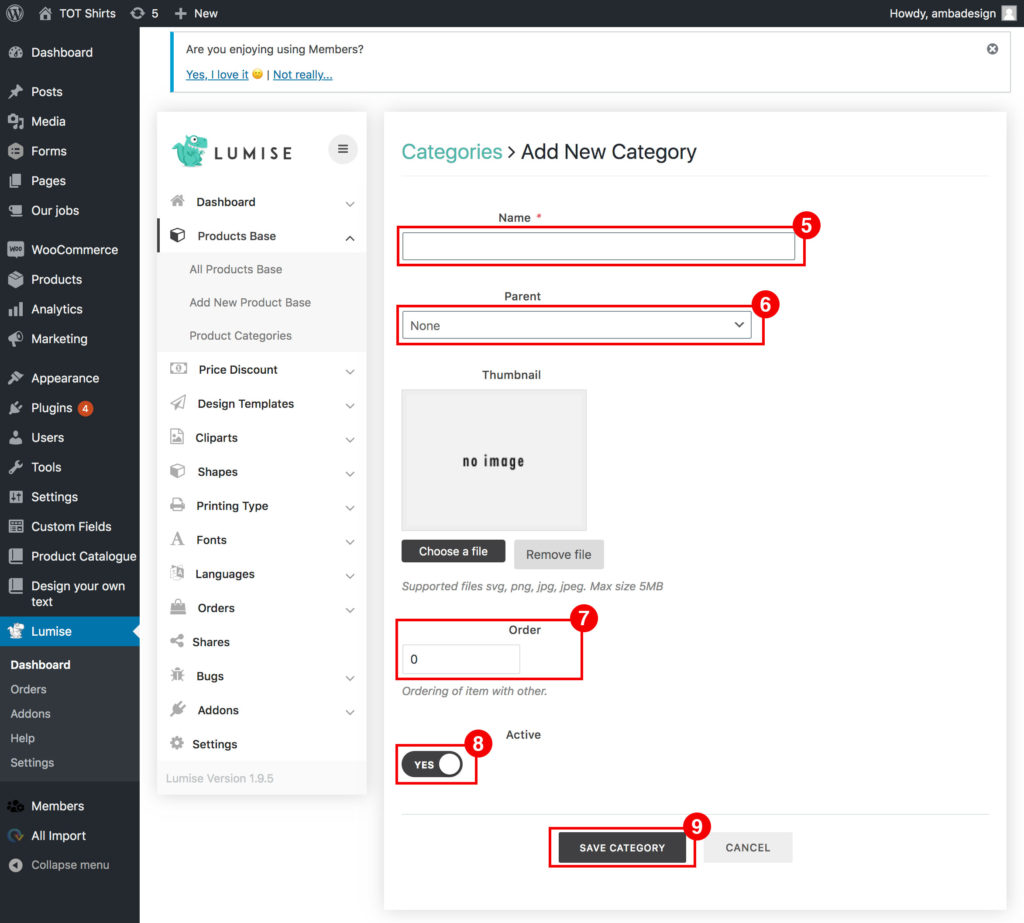
- Enter the name of the new category.
- If you want the new category to be a sub-category of any existing category, choose the parent category here.
- Here you can change the order the categories are displayed in on the categories menu.
- Active. By default this is active, but if you want to hide a category, just set this option to “No”.
- Save the category and it will now display and be available to select when creating or editing garments.
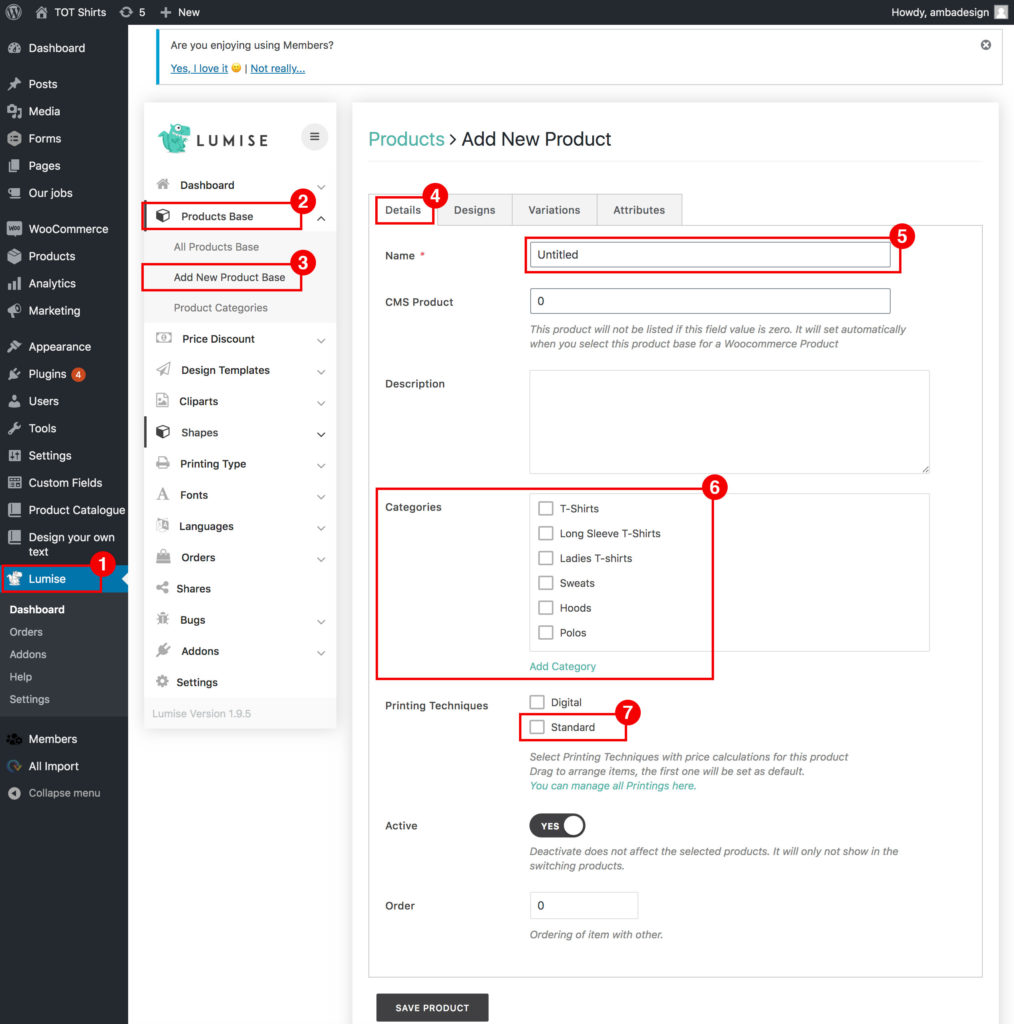
Creating a new product/garment:
- When logged into the back end of the site, click “Lumise” from the left hand menu.
- From the Lumise menu click on “Product Base”.
- Then click “Add New Product Base”
- On the Product tabs, click “Details”
- Enter the name of the product.
- Select or add the appropriate category for the product.
- Under the “Printing Techniques” options, select the option for standard.
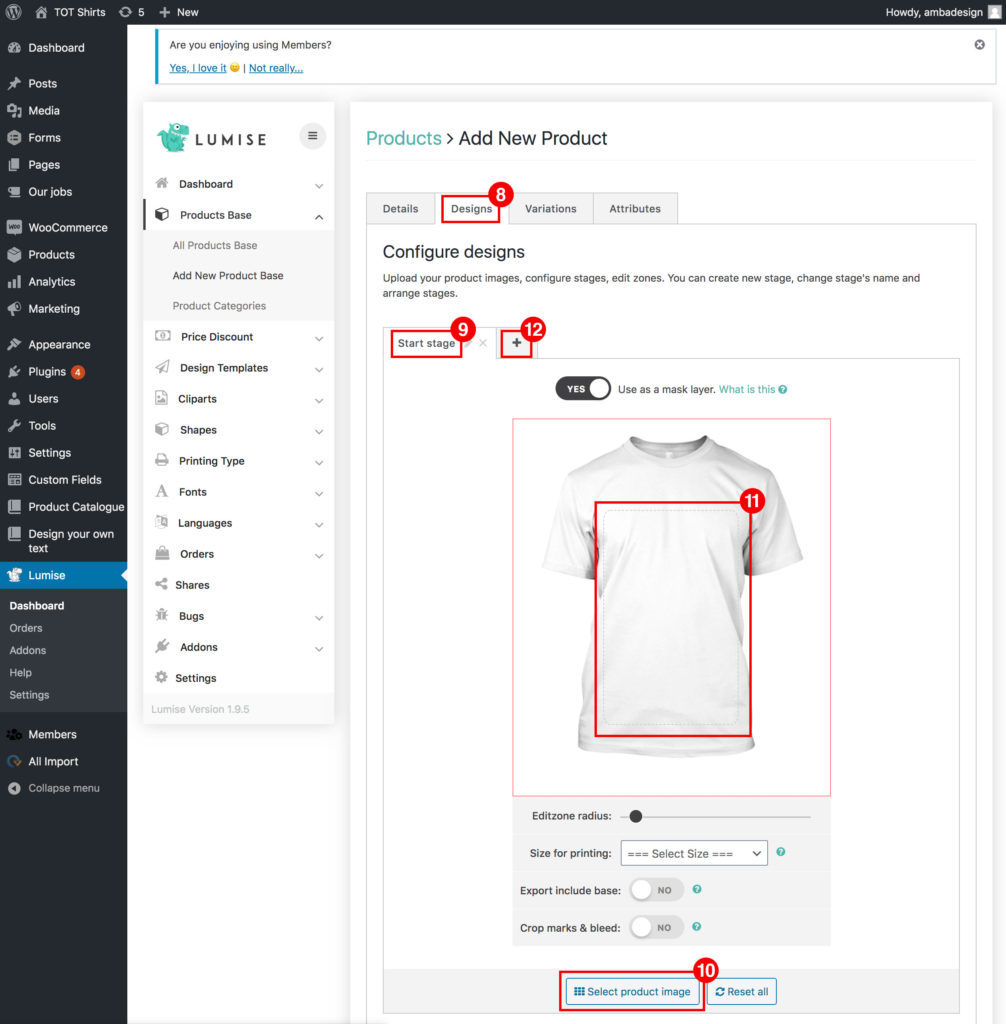
- On the Product tabs, click “Designs”.
- Click on the “Start stage” tab to rename this as your first view (e.g. Front).
- Click on the “Select product image” button under the image and select your image mask file to upload and use. For instructions on how to create image masks, please see this video link here.
- Size and positions design area on the new garment image.
- Add additional views as required by click the “+” tab.
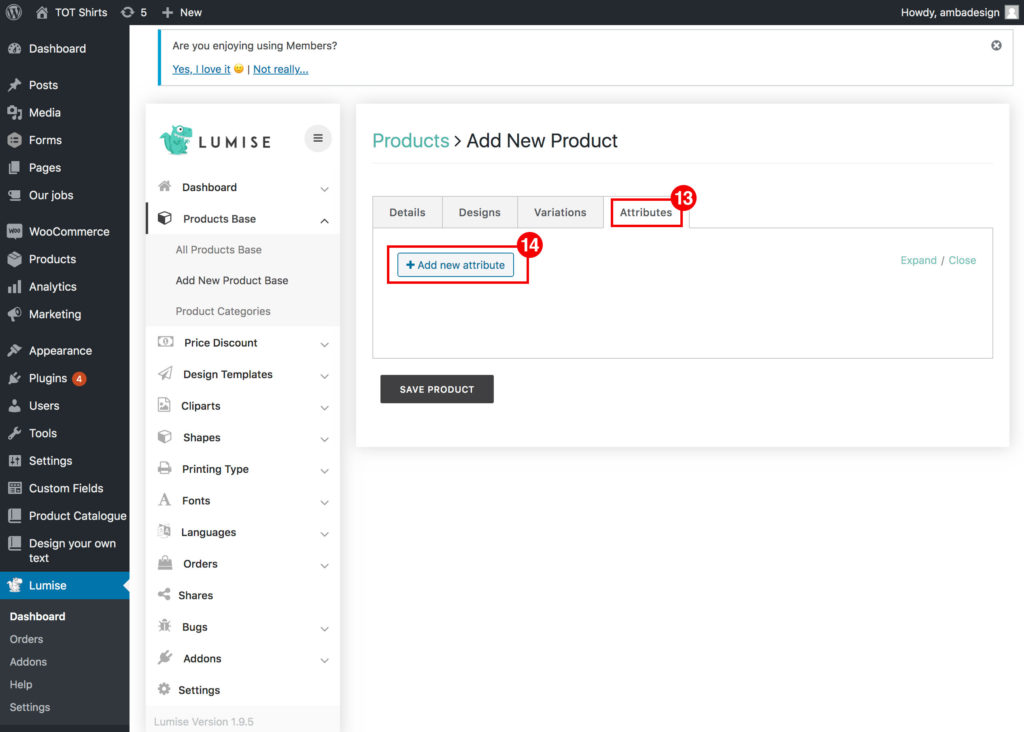
- Click on the attributes tab.
- Click “+ Add new attribute”.
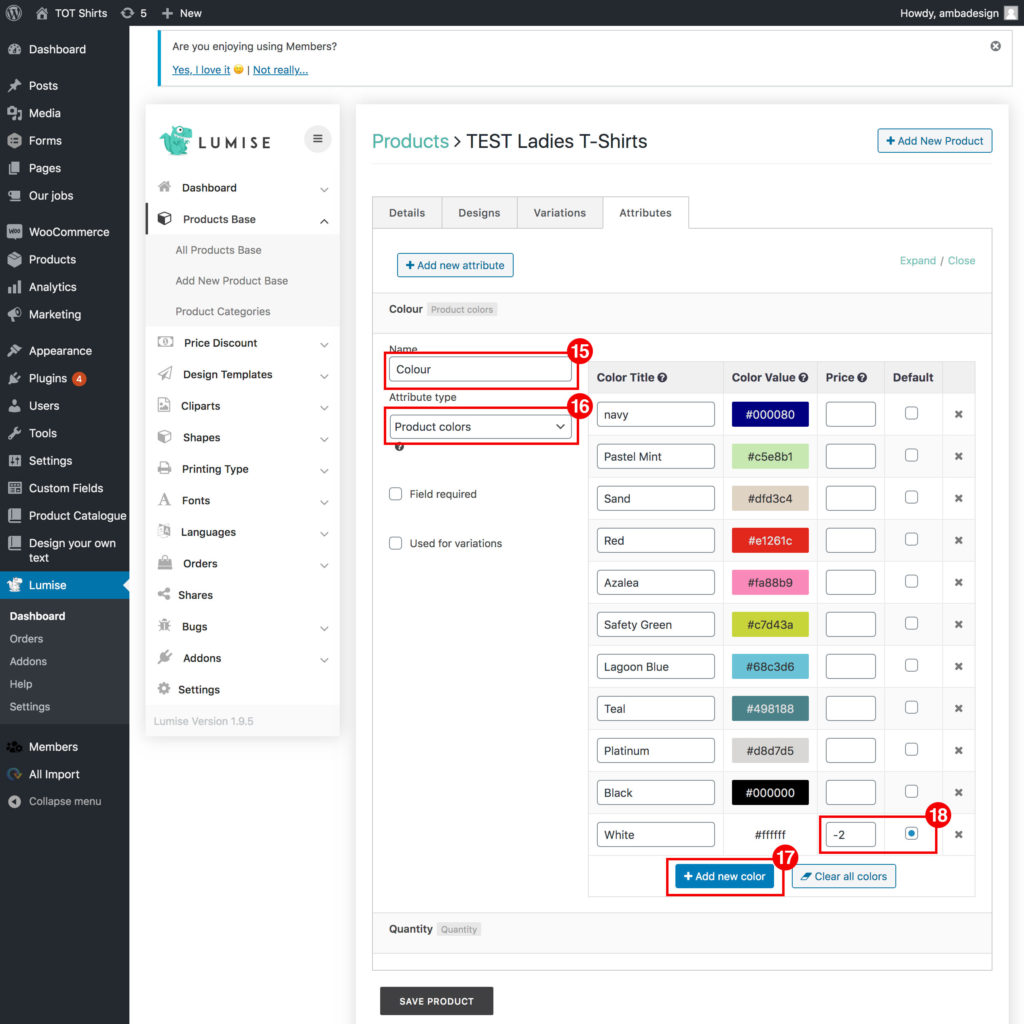
- Give the attribute the name “Colours”.
- Select “Product colours” from the “Attribute type” drop-down.
- To add colours, click “+ Add new colour” button from the box on the right.
Here you can select from previously added colours or create a new colour by entering a hex code (if known) or using the colour picker tool. Once selections have been made you are taken back to the attributes list and can set a colour as the default if required. - Here you can set one colour as the default colour. You can also set any price increases or reductions based on each specific colour.
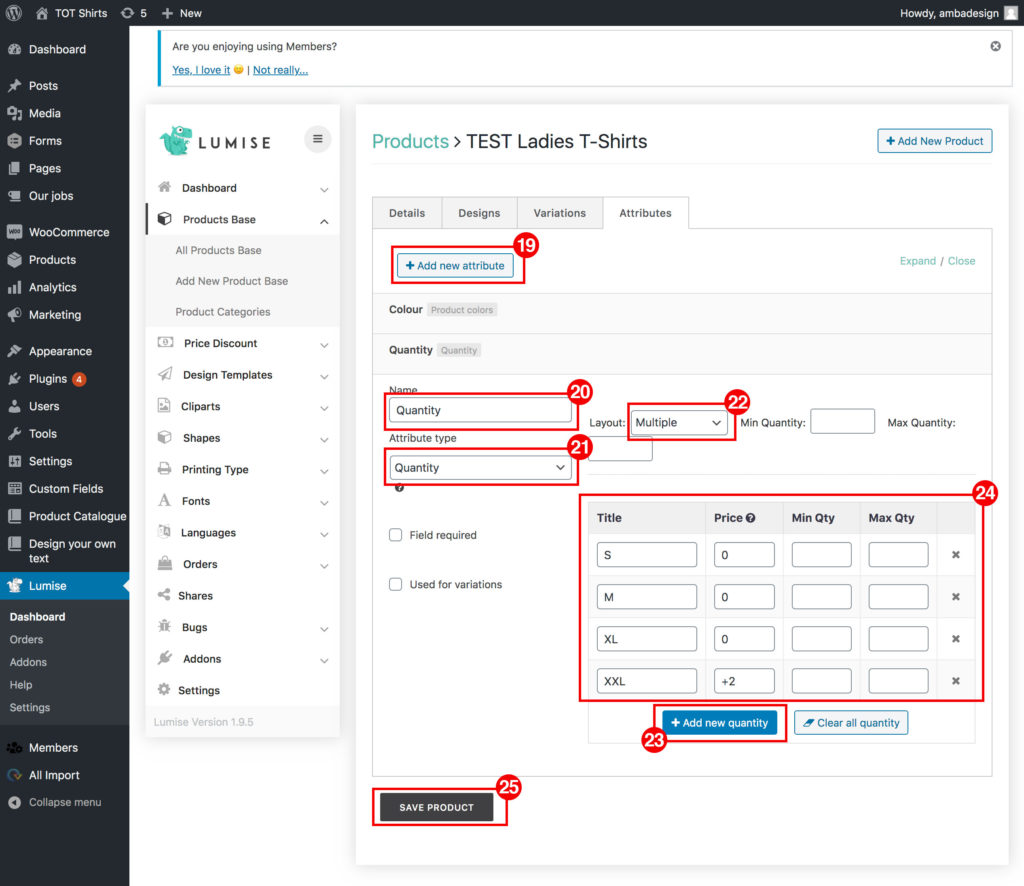
- Click “+ Add new attribute”.
- Name this attribute “Quantity”.
- Select “Quantity” from the “Attribute type” drop-down.
- Under “Layout” select “Multiple” from the dropdown menu.
- Add any additional size options required for the product.
- Here you can re-name any of the size options and add any price alterations based on the sizes (e.g. this example shows XXL items cost an additional +£2).
- Finally save the product.
Please note that the product will not be live on the site until you follow the “To make a product visible on the site:” stage as detailed below.
To make a product visible on the site:
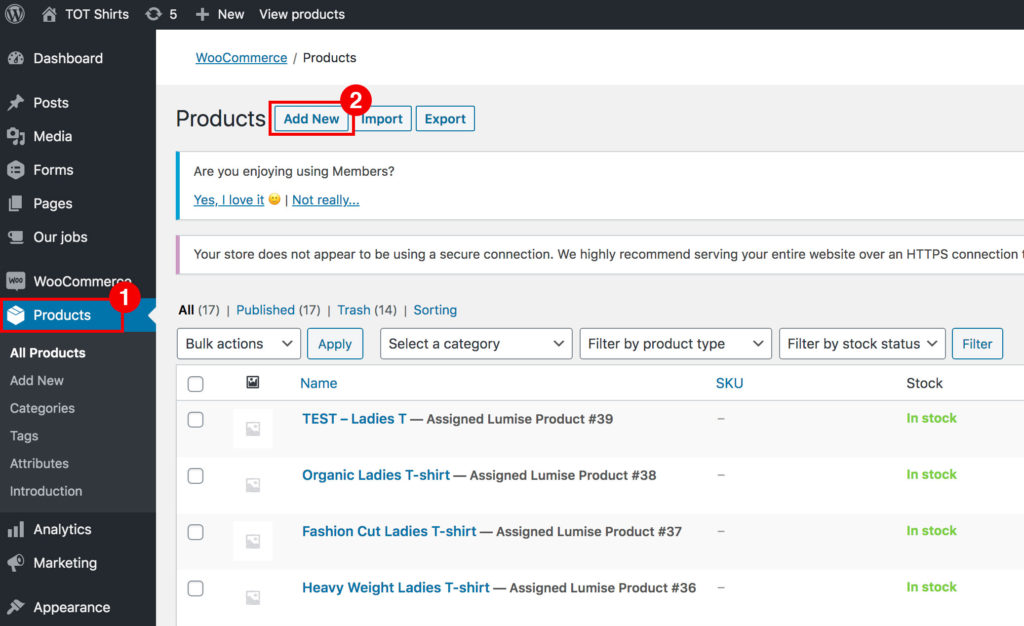
1. Click on “Products” from the the far left WordPress menu.
2. Click the “Add New” button.
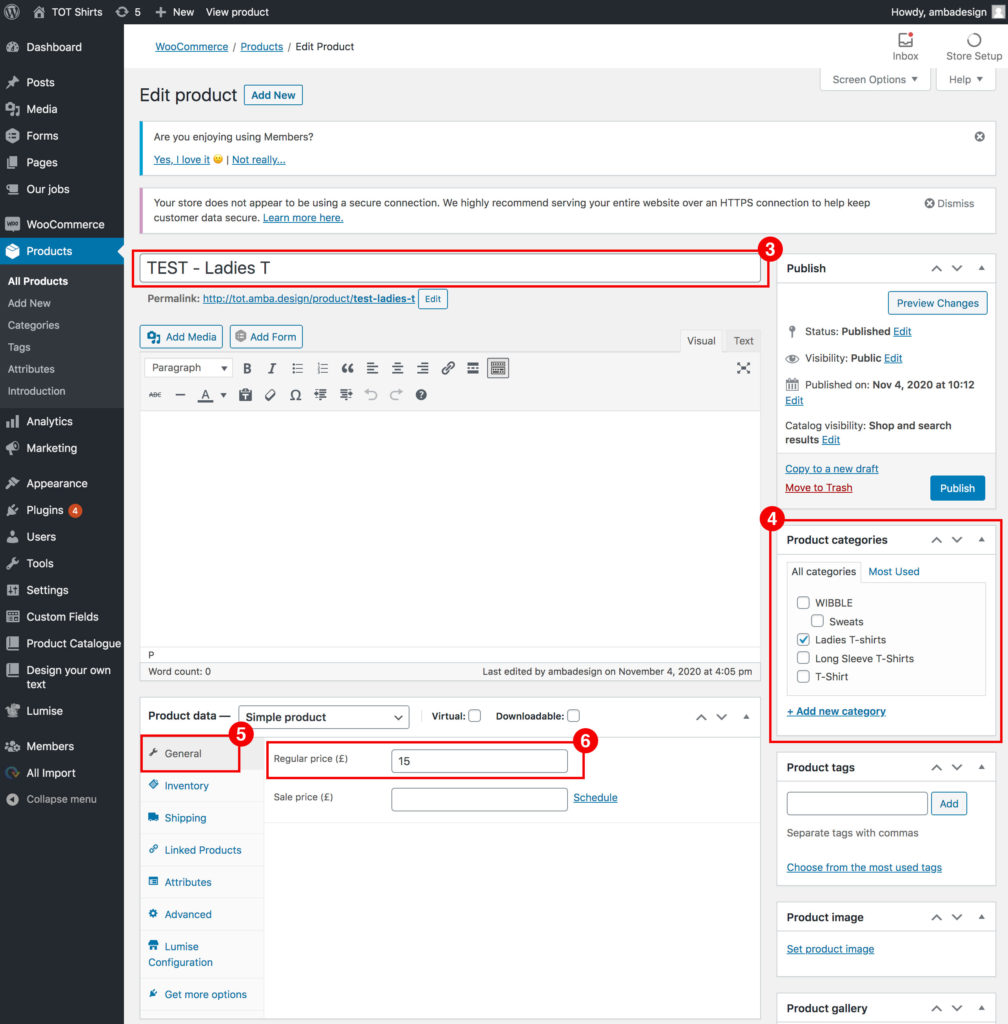
- Enter the product a name.
- From the right hand “Product categories” box, select the garment’s category. Note: This step can be skipped as it is just to allow for easy sorting of products in the back end of the site.
- In the product data box, click “General”.
- Enter the Regular price (price of the coloured versions of the garment).
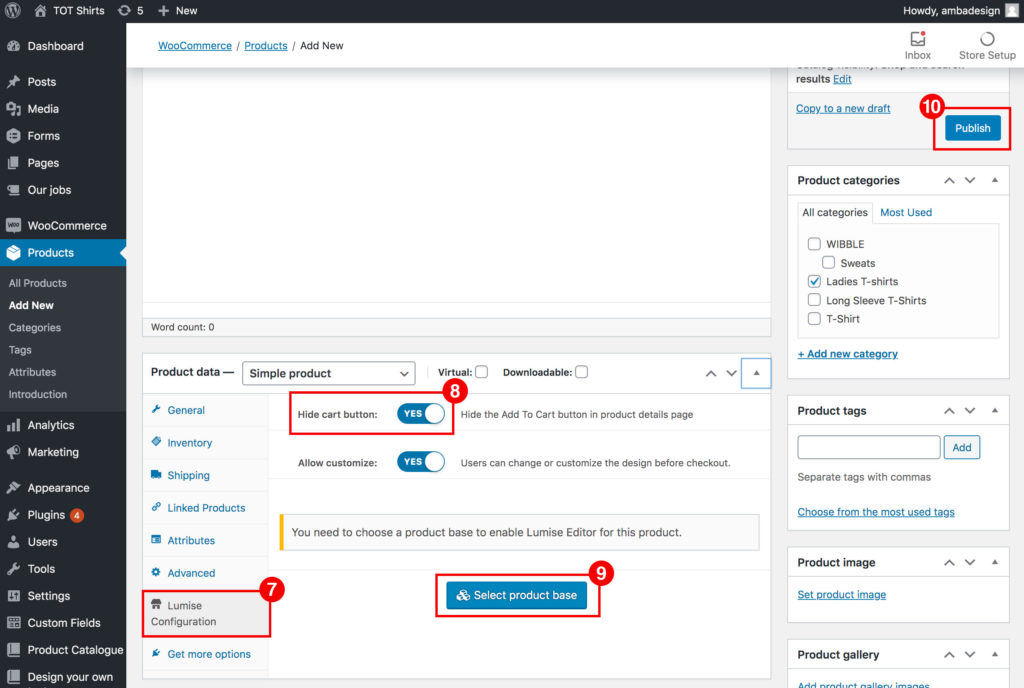
- Under the box labeled “Product Data”, click the item “Lumise Configuration.
- Change the “Hide cart button” option to “Yes”.
- Click the “Select product base” button to select the garment from the set up product base that was created in the above steps.
- Click “Publish”.
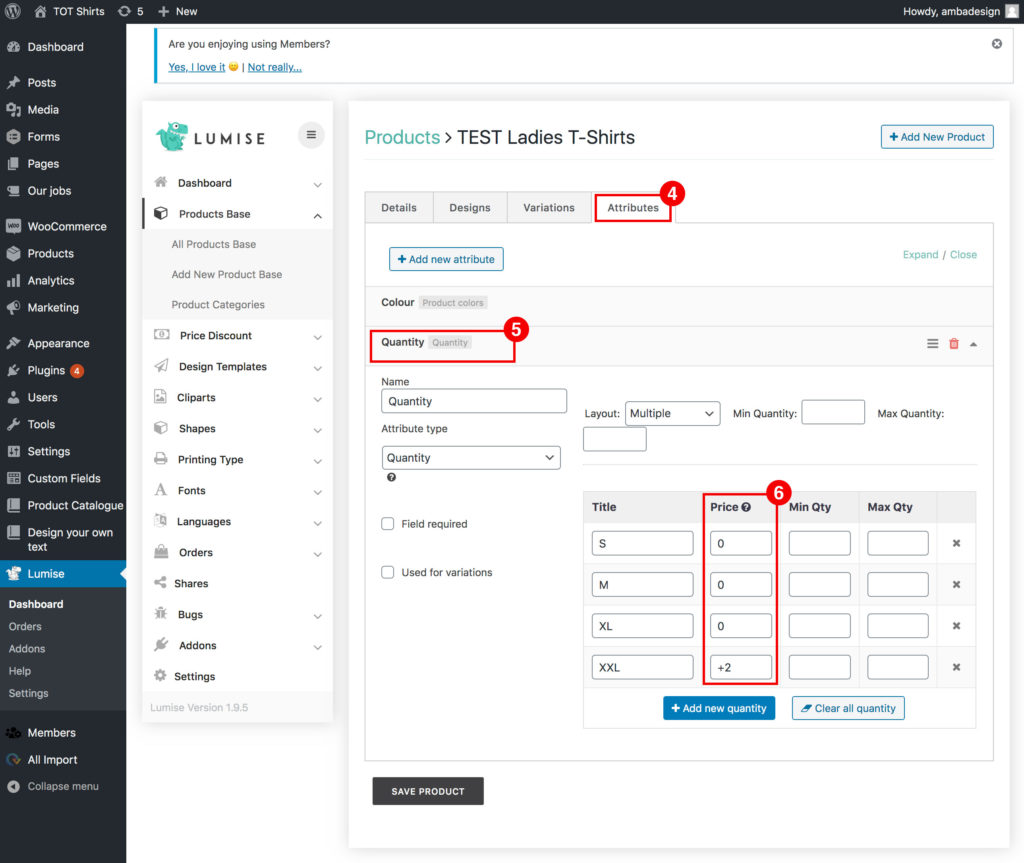
To add or edit garment sizes and set garment size specific prices:
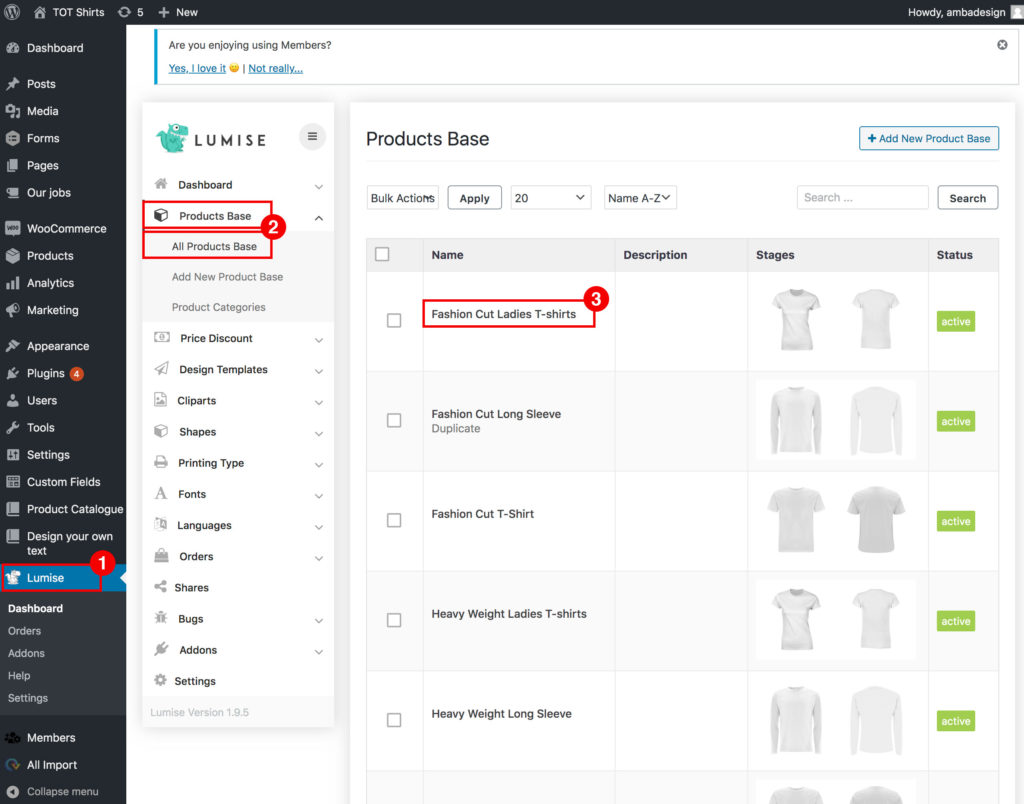
- When logged into the back end of the site, click “Lumise” from the left hand menu.
- From the Lumise menu click on “Product Base” and click “All Products Base”.
- Click on the title of the product you want to edit.
- Click the “Attributes” tab.
- Then click on the “Quantity” option. Here you can add, remove or re-order the sizes.
- Each of the individual sizes can be assigned a price increase or reduction by entering a “+” or “-“ and value as required (e.g. XXL is set to + £2).
Please note that the following two sections have been covered in creating a new a new garment above, but are detailed separately below for easy reference.
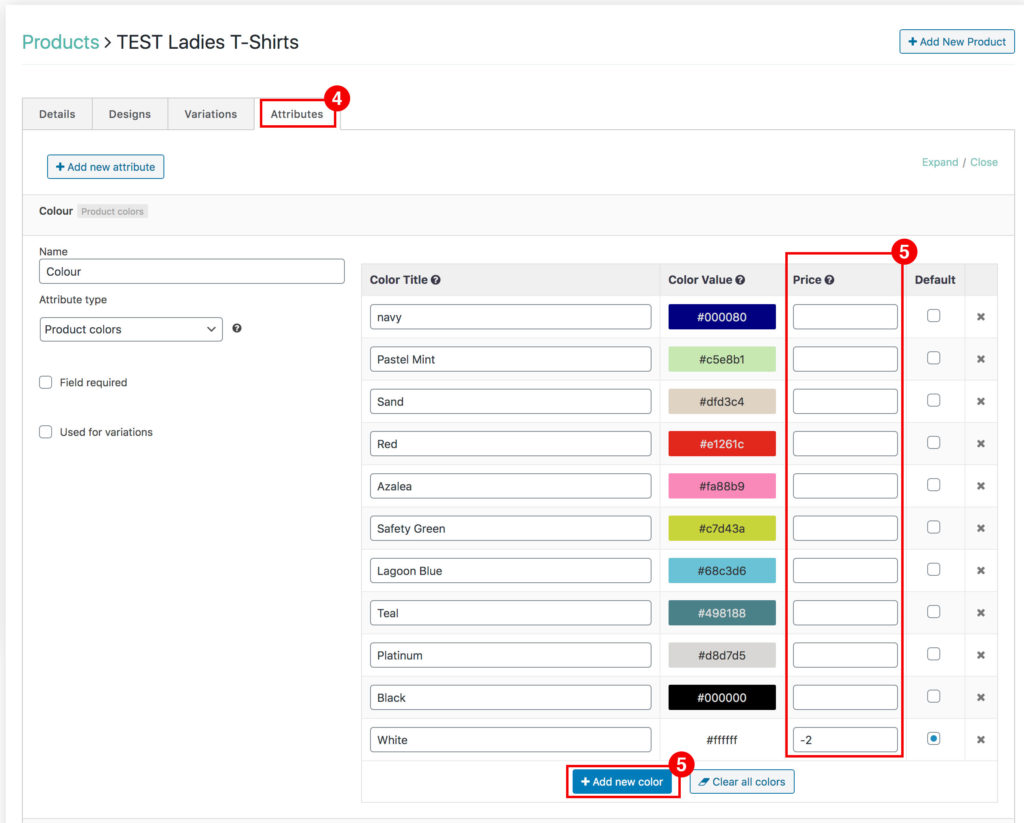
To add, edit colours or colour specific prices for a garment:
- When logged into the back end of the site, click “Lumise” from the left hand menu.
- From the Lumise menu click on “Product Base” and click “All Products Base”.
- Click on the title of the product you want to edit.
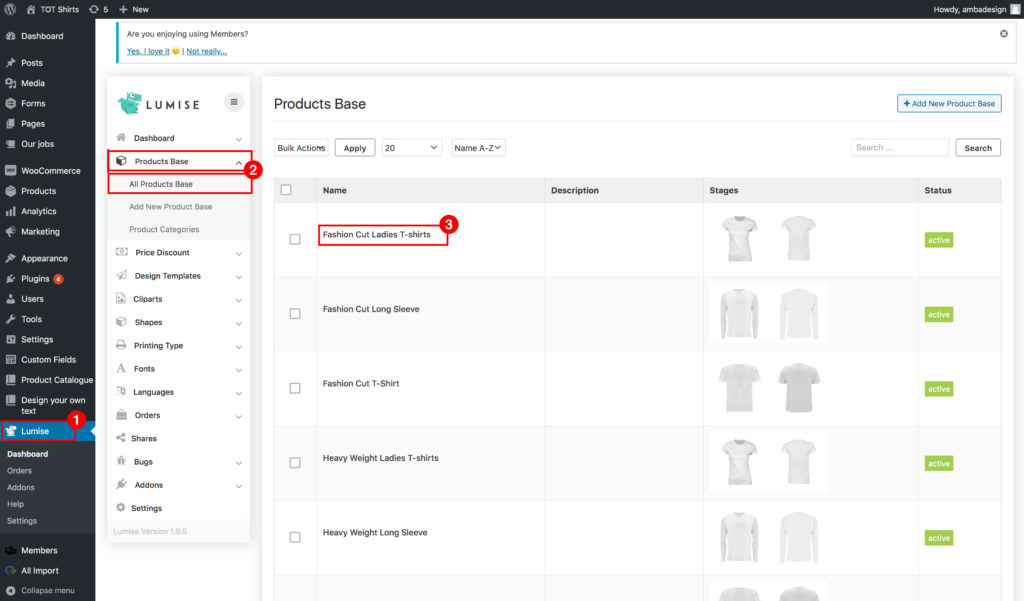
- Click the “Attributes” tab and click to expand the “Colour” attribute.
- Here you can add or remove colours as needed. Next to each colour you can include a price increase or reduction as needed (e.g. White is set to -£2 currently).